Search This Blog

Monday, April 30, 2012

Exciting News!!!!!!!

Soooooo I have some exciting news to share with all my 
wonderful readers a fabulous zibbet shop just opened up 
and I had the pleasure of accepting the invite 
to join a design team of talented lady's and join in on the design team 
fun!!!!! 
so check out these lovely lady's i will be having the pleasure to 
work with and all the great inspiration they bring to the crafting world 
and to see the goodies we will be working with just click on the link below


Monday, April 16, 2012

MDC April Challenge

The requirements:

MDC April Challenge
Theme: Recycled Wreath
Requirement: 50% Recycled Materials
Deadline: April 15th
The challenge for April is to create a wreath using recycled materials.  Be creative!  The only requirements are that it resembles a wreath and 50% of the materials used are recycled.
This challenge begins on March 21, 2012 and ends on April 15, 2012.  Voting will take place April 16th through the 19th.
Submit a photo of your completed project below.
The result :
The wreath i made is 98% made of recycled material
material's i used are 
  • 1 ACU top 
  • 1 ACU pant
  • 2 wire hangers 
  • 1 old red t shirt 
  • 1 old blue t shirt 
  • 1 old white t shirt 
  • a americana heart and star i found at goodwill 
  • 3 new buttons 
  • 6 feet of 20 gauge wire 
  • lipstick red folk art paint 
  • vintage white folk art paint 


to start making my wreath i bent the two hangers in a circle 
i had hubby cut the top of the hangers off for me 
then use 20 gauge wire an wired them together 
making a hook at the top of the smaller one 
so i have something to attach the heart to 
then i made a huge pile of shredded ACU material 
then i just tied them on the wire hanger circles 
then i made flowers out of the old t shirts 


 then i pulled apart the heart and sanded it and re painted it 
then sanded it to age it a little again 
then hot glued some buttons onto the blue star 


this is the result 


then i twisted together 4 pieces  of 20 gauge wire 
and made the hanger for the heart 
then i attached the flowers to the wreath by hand sewing them on!
then i attached the heart to the loop of wire hanger with a heavy duty stapler
 
TFL... hugs Kimmie 

Wednesday, April 4, 2012

some one squirreled and told me its your birthday!!!!

I just love how this card turned out!!!
One of my dearest friends asked me to make her 
a card with a squirrel on the 
the front so this is what i came up with!
I used tons of wild orchid craft flowers.
and the paper is from dcwv and my minds eye. 
the image is a digital  motivet stamp and
colored with my spectrum noir and copics.
the sentiment i came up with and printed it out and turned into ribbons.
and i used some lace ribbon and a paper doilies to tie it all together
the inside of the card! 
thanks for looking hugs Kimmie

Tuesday, March 20, 2012

Feel better soon card!

Happy first day of spring!!!!
well as winter turns into spring in Washington state 
it feels like the infamous yucky cold come knocking on our door!
right now every one i know has a cold, cough or the flu!
soooooo I am trying my hardest to stay away so i don't get it 
but i want them to know i still care an love them!
sooooo with that being said i decided to make 
a few get well soon cards!
i got the idea for this card by watching you tube 
the channel i seen the flowers on is: vadeler
she made the prettiest card!


the card is a standard A-2 card
the designer paper i used is from hot off the press
the solid paper is from the dcwv line the chateau lavender
and the punches i used are from Martha Stewart
the boarder punch is called the arch boarder punch 
the butterfly punch is called 3-1 Classic Butterfly Punch
the sentiment is from hot off the press stamp of the month club!
soooo using my cricut and gypsy 

i made these cute little tulips!
 the cartridges i use are:
for the tulip flower i used - mothers day bouquet
for the tulip stem i used - walk in my garden
these are the cuts i used

to get the tulip shape i just trimmed off two of the petals 

then you just fold the bottom petal up wards and tack down with 
a foam dot to have the 3D look!
Then i used my pebbles glitter chalks to edge it !
to attach it to the stem simply snip off the tulip tops of the die cut 
and adhere it down with some wet glue i used glossy accents 
but any glue will work!
 to get the look on the card i just layered up three of the stems 
and then i cut apart another for the leaves and 
added the leaves on top of the it to give it a 
bouquet look!
then for the little pot!
 i drew out a pot and pot rim on thin chipboard 
an cut it out to make my own little 
stencil!
 then i traced it on some light blue card stock and cut it out!
then i used my pebbles glitter chalks to edge it!
I glue the rim down to the top and placed it on the card 
with some foam dots!
and then I hot glued down a organza bow!
then just punched a few small butterfly's in lavender and placed them around the flowers
and a large one on the flower pot! 
Thanks for Looking 
and i wish you all the flowers spring can bring!!!
hugs Kimmie 


Monday, March 19, 2012

Tiny dino card and sketch


This cute card was so much fun to make and I think it
will be a great to add to my stack of operation write home cards
I have to send in!
Here is the sketch i found on line that inspired this Dino card!

The list of products I used:
Tim Holtz-  tea dye distress ink
Tim Holtz- alterations die styled labels
Sizzix Framelits- circles scallop
Ek succsess boarder punch
green organza ribbon
white & black card stock
Lost & Found designer paper pad- Breeze
Stamp- Small Dino from hot off the press
spectrum noir markers-
color list:
TB1
TB2
GB5
OR1
CG1
CG2
Stampendous embossing powder - midnight black noir
Versa mark ink- water mark
thanks for looking
hugs kimmie
and if you might want to check out operation write home heres the link!


Sunday, March 18, 2012

How to make your own copic / spectrun noir storage!


 Supply List:
*8 pieces of 12x12 thick chipboard
*5 sheets of designer paper
two sheets for the out side
four sheets for the inside
and one sheet for the boarder
(i used rosewood by colorbok)
*paint color of choice (i used vintage white by folk art)
*8 sheets of white card stock
*hot glue gun
*hot glue sticks
*boarder punch (i used scallops by fiskers)
*hole punch ie. cropadile
*mod podge
*ruler
*pen to mark the measured lines
*paint brush for paint
*paint brush for mod podge
* flat back pearl trim
* 2 screws and washers if you plan to hang it


Lets begin!
step 1. cut chip board to these measurements
five pieces of  6x12 inch chipboard
4 pieces of 6x4 inch chip board
Tip: i used my westscott titanium paper trimmer to cut my chipboard
the blade seems to be longer and with a little pressure it cuts
nicely

step2.  cut 24 6x2 inch strips of white card stock then
score at the center and fold in half
(see pix for example)
step 3. hot glue the folded strips to the ends of
all the the 4x6 chipboard on both sides.
 (see pix for example)
step 4. hot glue together two of the 6x12pieces of chipboard.
step 5. find the front edge's of the of the 6x12 and 4x6 chipboard pieces
and paint them with the color you choose.
step 6. time to make the top and bottom of the shelf
grab 4 of the 12x6 pieces of chipboard hot glue one
piece to another to make the shelf sturdy and the repeat 
with the remaining two pieces of chipboard
then paint the edge that will be facing the front of your shelf !
(see pix for example)
 
step 7.  grab one of the 6x12 pieces of chipboard this piece will
be the center of your shelf with your ruler measure 4inchs in and 8 inches in
and draw a line and then repeat on the other side this will be
where you attach the slats
(see pix for example)
 step 8. now grab the 6x4 pieces and hot glue them down to the lines you
drawn on the center shelf make sure you have all
the painted edges facing the same way!
(see pix for example)
step 9.. you should have 8 pieces of the folded white card stock
grab 4 of them and hot glue them to the ends of the center shelf
this is what is going to hold the side walls on
(see pix for example)
step 10. measure the 4 inch and 8 inch mark on the chipboard
you made for the top and bottom of the shelf make sure to  
just mark lines on the inside piece of  the chipboard
 (see pix for example)
step 11. making sure the painted edge is facing  the same direction
of the rest and hot glue the top and bottom chipboard to the
remaining tabs
then with the last four of the folded white card stock tabs
hot glue them to the edge of the top and bottom pieces of the shelf
this will be what hold the side walls on!
(see pix for example)
step 12. now its time to measure the height of the shelf
this will be different for each shelf depending on the thickness
of the chipboard you use!
(for example my shelf measures 8 1/2 inch's tall x 6 inch's wide)
step 13. cut the last four  pieces of 6x12 inch to the height of
your shelf
then hot glue them together to make two sides for your shelf
then paint the edges that will be facing the front of your shelf !
step 14. now hot glue the sides to the white tabs on the shelf
(see pix for example)
step 15. now its time to make the back of your shelf
the back should measure the height of your box times 12
(for example my back measures 12 x 8 1/2)
then with the last two pieces of 12x12 chipboard cut them to the
height of your box  then hot glue them together!
(i want to be able to hang it on the wall so i am cutting two pieces of
chipboard to make it strong enough to hold the weight of the marker
but if you want it to just sit on your desk one piece of chip board for the back will work)
step 16. time to paper the back of the shelf that will be showing threw
the front cut your designer paper to the size of the back of your shelf
and paint on some mod podge and adhere it to the chipboard!
(see pix for example)
step 17. (this step is only for hanging your shelf if you choose to set it on your
desk or shelf then you can skip this step)
with your ruler measure one inch down from the top of the shelf and draw a line
then on that line mark the 2 and 10 inch spot on the back
step 18.  to adhere the back to the cut a two  2 inch by the height of your shelf 
strip of white card stock an two 2 inch by 12 inch strips of white card stock
score at 1 inch fold in half and then hot glue them to the edges of the back of
your shelf !
(see pix for example)
step 19. time to paper the in side !
with the 4 pieces of designer  paper you choose for the inside cut
six 12x 6 pieces
and
six 4x6 pieces
step 20. paint on mod podge
line it with one of the 12x6 inch strips of paper
then adhere one of the 4x6 inch strips of paper to the empty
space of the square!
(see pix for example)
(do this on all six squares of your shelf )
step 21. time to paper the out side!
with the two 12x12 pieces of designer paper that you choose
cut them to 6 x12 inch's
on the sides of the box paint on some mod podge and then adhere
the paper and then wrap it around and adhere down do this for both sides
then paint some mod podge on the top and adhere down the paper
and the repeat for the bottom!
(see pix for example)

step 22. time to make the boarder!
with the last 12x12 sheet of designer paper cut it to
12x3 inch strips make 4 strips to wrap around the back of your box !
(see pix for example)
step 23. using your boarder punch, punch one side of the
the paper to make a decorative edge!
step 24. using the mod podge adhere the boarder  around the back edge
of the top of your box starting with the sides first!
step 25.  using your hot glue and flat back pearls trim the
edges of the front of your shelf!
(see pix for example)
and walla there you have it your very own shelf to organize
your copics, spectrum noir  markers or inks and other crafting tools !
you can make a couple and stack them on your desk
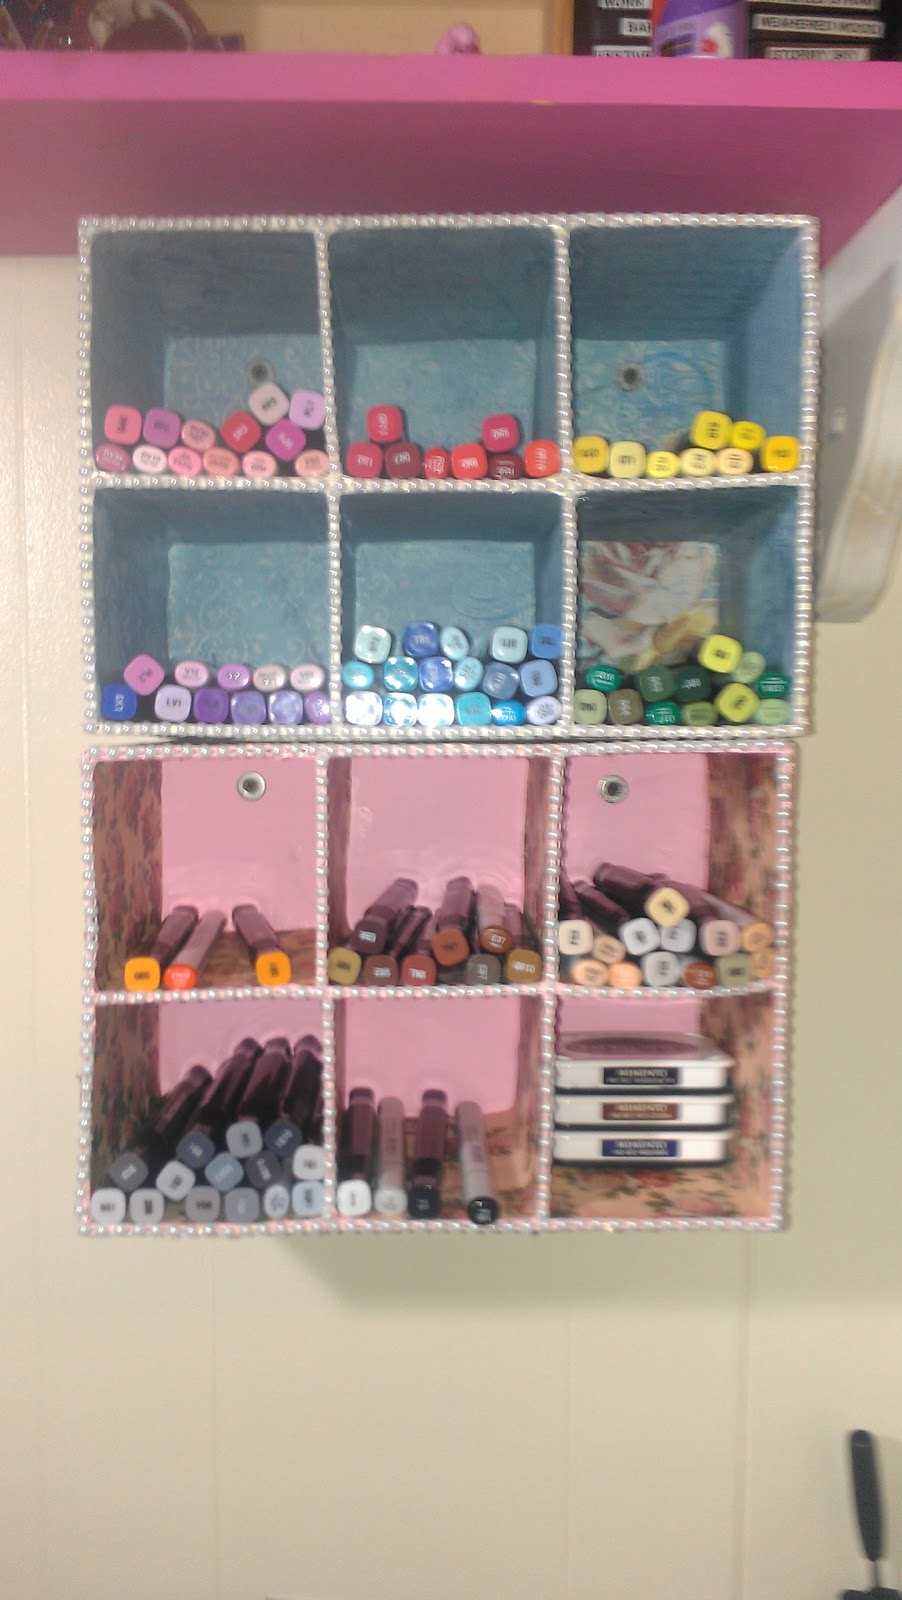
like this!
with making two shelf boxes I'm able to
organize my markers by color a slot for my
pinks
reds
purples
greens
yellows
browns
oranges
blues
grays 
blacks and blenders
skin tones
and even a spot to hold my memento ink!
or hand on the wall like this
( i used 2 screws and 2 washers to hang each box)
I hope this tutorial helps with your storage needs if
you need any help trying to understand my ramblings lol
let me know i will try and help as much as possible !
hugs Kimmie


Friday, March 16, 2012

Copic & Spectrum Noir storage

This box is meant to hang on the wall or sit on the desk
I'm not sure what place i will put it yet!
This storage box is made out of extra thick chip board!
It took a lot of thought measuring and planning to get it just
right i wanted room to add to my collection
and a way to store each color in a color family !
I'm thinking i will make another one so i can separate my colors better
and maybe a entirely new set just for my copics to have a home of there own!
an I'm thinking of making a shelf to hold my distress inks also I'm not sure yet!


tutorial  & pictures to come!