Search This Blog

Sunday, August 19, 2012

month of Aug Design team projects

wow time has really flown by this year for me 
seems just like yesterday we were bringing in the new year 
at my house ......
well august brings alot of excitement for me because this month 
for Shabby Scraps we focused on using the gorgeous
fabric tape and i have had a addiction for that 
stuff since the very first picture was 
put up in the Shabby Scraps Shop. 
so with out further babbling lol 
here are some pictures 
 here is a victorian boot i found at a local
thrift/antique store it was in not so great condition but 
i seen the possibility's in it 
here is a befor picture 
  please excuse my messy desk lol 
its my creative process lol  ....
so as u can see i painted it white 
and then covered the whole thing in 
white lace then i use some 4 mm flat back pearl trim to
trimmed the whole thing 
then uses some pink eyelets and ribbon to lace it up 
then i made some cute rolled roses out of the 
beautiful Shabby Scraps fabric tape 
i know its pretty simple but i love the soft lady like  feel of it
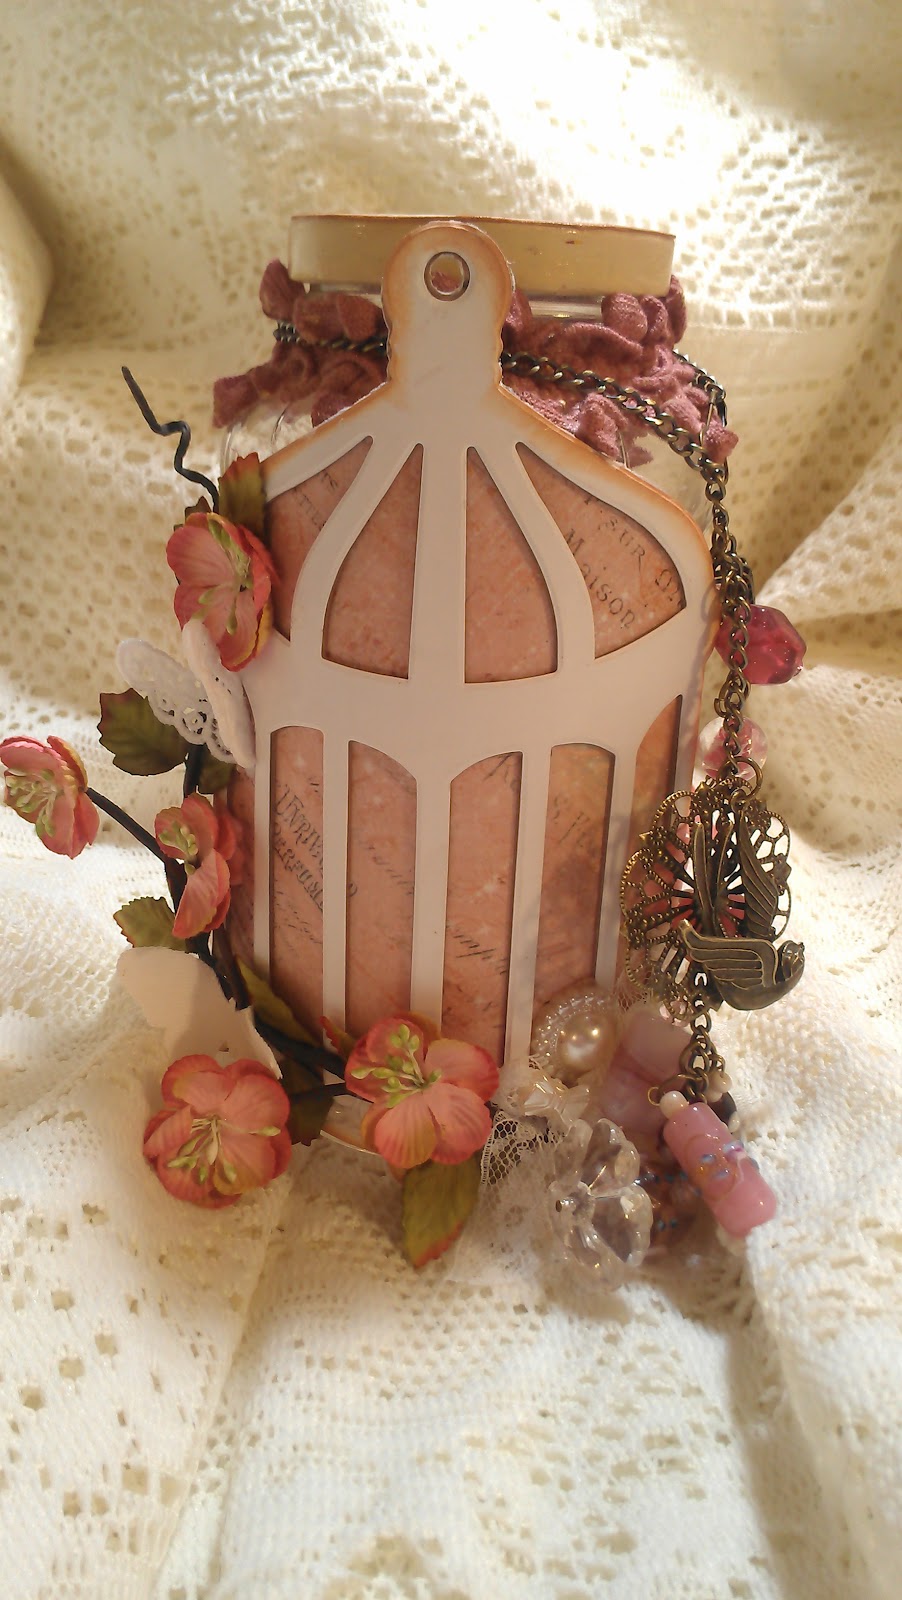
pt.2 of the month of Aug DT project 
yep you read right this month we had to make 
two  yes two projects using yes my fav 
the fabric tap 
part two of this month was a theme we had to make 
a tag show casing the fabric tape 
well just one tag wasnt enough for me lol 
so i used my sizzix pro die cutting machine and 
the pro die titled album tags and made my 
self a sweet shabby chic mini for 
mine and hubby's 9 yr anni
so heres the pic
i used a ton of shabby scraps in this mini
and love the soft shabby chic look of it
soooooo after a extremely long post i think im going to say
thanks for looking and see u laters
huggers Kimmie 

Wednesday, July 18, 2012

Shabby Scrap and Creating is Fun Blog hop!!!!

wow..... this is my very first blog hop and first chance to 
work with some laces and trims from 
creating is fun and be able to 
add some delish Shabby Scraps products to 
help my projects come to life 
as a design team member of Shabby Scraps I get the chance 
to use these amazing products month after month 
if i had to pick just one item to use i would say 
ummmmm.... all of them lol 
the lace and trims from creating is fun was 
really hard to pick from almost impossible 
to choose what one i wanted to use lol....
(yummmmm lace) 
so check these two amazing shops out 
heres the links
http://www.zibbet.com/shabbyscraps
n
http://www.zibbet.com/CreatedbyMartha

compleat the whole hop and be entered into the 
drawing to win some goodies from both shops 
 good Luck !!

Now for my new and old followers!!
 comment and follow my blog and be 
entered n a chance to win a handful of 
shabby scraps goodies from me!


here's the blog hop line up
Martha-creatingisfun.blogspot.com 
Carissa-www.shabbyscraps.com 
Hannah-http://theperrylane.blogspot.com/ 
Rachel-http://rcbogner.blogspot.com/ 
Kimmie- www.scrapindipitychicks.blogspot.com 
Violet- http://allthatscrap4him.blogspot.com/  
Samantha- www.scrapindipitychicksamantha.blogspot.com 
Maria- http://riacreations.blogspot.com/ 
Veronica- artfulcreations1.blogspot.com 
Kristina- www.messydeskcrafts.com
Rebekah- www.messydeskcrafts.com
HAVE FUN HOPPING ALONG!!!
HUGS KIMMIE!!!

Saturday, July 14, 2012

hand made shabby chic plaster embellies

Hi there every one 
so i had a brilliant idea and im soooo very happy that my idea worked out 
so it all started by cruising the web trying to feed my shopping 
addiction with a lil window shopping lol it never really works 
i always end up wanting to go shopping more 
well i was on a web site
(scrapbooking.com) 
and 
a light bulb went off when i seen this here 
picture 


now i have been looking at these embellies for 
a long while but i cant bring my self 
to pay so much for sooooo little lol
shopping addict with common since
doesn't make since to me either lol
but any who this is what i came up with 
n here is how i did it


and pt.2 here


now as promised a supply list just for u to give it a shot 
  • Air dry plaster ( i used the colorbok brand)
  • a disposable bowl
  • measuring tools (i recommend a 1 tbsp and a 1/2 tbsp)
  • stir stick 
  • molds ( in my vid i showed u how to use sculpty as a mold if u dont have any silicone molds)
i hope this helps and if there are any questions 
ASK lol i <3 to help !!!
Hugs Kimmie 

Monday, July 2, 2012

Shabby Scraps Challenge


Live the Life you Imagined 


Soooo here it is my creation  for the Shabby Scraps 
Messy Desk challenge
you can find all the products i used in this project here 
http://www.zibbet.com/shabbyscraps
what i decited to make is a piece of wall art for my 
living room  
the challenge was to use 2 or more products 
from shabby scraps 


 this is the first part of the wall art 
in this piece i  use a few different products 
from Shabby Scraps 
here is a list of products i used 
from Shabby scraps  

  • Venise Butterfly's
  • flat back pearl bow 
  • bird cage mini album page 
  • flat back pearl heart


this is the second page down of my creation 
on this one the products i used are 
from Shabby Scraps 

  • bird cage mini album page 
  • large cameo setting 
  • venise butterfly 


last but not least this page has a ton of 
Shabby Scrap goodies 
here is the list 
from Shabby Scraps 

  • large bird cage mini album page 
  • small bird cage mini album page 
  • pearl flower centers
  • flat back pearl heart 
  • pink shabby ribbon 
  • canvas butterfly 


non shabby scraps products used 

  • pink paislee- london market paper 
  • wild orchid craft flowers 
  • lace from my stash 
  • tim holtz bird cage die ( just the bird) 
  • tim holtz sewing room die (just the dress form) 
  • tea die distress ink 
  • victorian velvet distress ink 
  • black soot distress ink 
  • martha stewart butterfly punch 
  • jute rope 
  • hand made paper beads out of the london market paper
  • 2mm pearl strand 
  • vintage white folk art paint 
  • pink seed beads

I just love the way this project turned out 
so pretty and full of love if u see any thing in this 
project and would like a tutorial just message me i would love to make 
one for u 
Hugs Kimmie 
dont for get to check out Shabby Scraps:
 http://www.zibbet.com/shabbyscraps
or the messy desk face book group 
https://www.facebook.com/groups/Messydesk/
TFL :0)


Wednesday, June 27, 2012

Hand made smash book swap!


so ok here is my smash book i made for the 
hand made smash book 
my partner is cayla 
this is a scrappy divas face book group swap 
i had to sit long and hard thinking of how i was going to pull this one 
off cause it was way out of my crafting comfort zone lol
so i asked her what her craft likes were and she told me 
goth, grunge and steam punk and 
out of those choices this is what i chose to make :-) 
thanks sooooo much for looking hugs kimmie

Alter 1 jar into a pincushion swap


so here is my little jar for my partner Mimi 
i really hope she likes it 
she told me she really likes the shabby chic 
theme and soft pinks and creams so 
this is what i came up with i use 
a lot of lace and trim and a shabby scraps goodies 
(ie: shabby crack - a long running messy desk joke) 
and i even used some glass bobbles as little feet 
this is my cutie stick pin cushion i got from my partner mimi 
i just love how it reminds me of ice cream hehe 
i love the cute lil' butterfly on the front 
thanks mimi for my wonderful 
jar 
thanks for reading hugs Kimmie

Saturday, June 16, 2012

month of junes DT project for Birelanddesigns.com altered


I'm calling it Paris couture girly grunge!
so this is my very first project for birlanddesigns.com and i have to tell you it felt sooooooo very good getting back to my first love.... after i ventured to crafting outside of scrapbooking and card making i started altering and love the look of grunge! but any one who knows me knows any thing i may come up with it needs slashes of color so i started adding pinks to the browns and green and purples and what happened girly grunge hehe so exciting right lol well any who i was so thrilled the moment Barb @ Birelanddesigns.com asked me if i would like to be part of her design team with all the sweet products she offers i would have be half crazy to say no lol well when the first package arrived i have to admit i gasped i got to play with products from companys like pink paislee  and glitz designs and then the hand died shabbys and pettaloo flowers and scrumptious lace oh i could go on and on but any who this is what i came up with and i have to admit cutting up that french kisses paper by glitz was heart breaking but i love what i created with it!!!
thanks for looking Hugs Kimmie  
find the products i used and many more here :
 http://birelanddesigns.com/

I am awesome bird cage jar DT project for Shabby Scraps

This Project was sooooo much fun to make 
and the best thing about it is that its sooooo shabby chic 
i really love the soft famine feel of it !
the products i used are as fallows
Shabby scraps products 
  • bird cage mini album die cut 
  • shabby pink ribbon 
  • canvas butterfly's
  • vinise large butterfly 
  • pearl flower center 
  • pear pin 
  • pearl flat back bow 
  • shabby rose trim 
  • large bird charm 
  • bird cage charm 
  • small heart flat back pearls 
  • clear acrylic flowers 
  • shabby braided trim 
and can be found here 
http://www.zibbet.com/shabbyscraps?offset=3#navlink
non shabby scraps products i used are 
  • prima's fairy bell collection paper 
  • Primas flower spray 
  • a mix of lamp work beads from my stash 
  • a filigree flat plate from my stash 
  • and chain from my stash 
  • french vanilla folk art paint 
  • glimmer mist in the color S.W.A.K 
  •  glimmer mist in the color old lace 
  • and a large jar
thanks so much for looking 
if u have any questions please ask!!!
hugs Kimmie

Wednesday, May 30, 2012

altered light switch plate

this was so much fun to make i seen a pin on pinterest where 
a lady had altered her's in the steam punk theme and it made me 
want to alter my light switch plate 
so my craft room is very shabby chic girly so i wanted to 
do mine geared toward that theme so i used the new fairy belle line from prima 
along with flowers from that line and chip board from that line i fussy cut out 
the fairy and a few butterflys  i mod podged down the back ground paper 
then inked the edge with tea dye destress ink then i took a paper doily and 
rubbed some destress ink onto that the mod podged it over the corner then i applied the 
pearls , chipboard piece, flowers and butterflys then i took and sprayed some 
clear acrylic sealer spray and wal la all done!!!
thanks for looking 
hugs kimmie

Mdc stick pin and charm swap

well hello all you lovely people :-) 
well i'm so excited about this swap i put a lot of time and effort 
into this but i have to admit i dont want to make another charm for 
at least a month hehe 
so the swap entailed making one 6 inch stick pin one 3 inch stick pin 
and a charm for every one who signed up for the swap 
so any who i tried to match my charms & pins  to the people 
receiving them as much as possible
so here are a few pix of the charms & pins  i made :-)


 thanks for looking 
hugs Kimmie
if you are interested in joining in on some swaps 
or finding a crafty community 
heres the link to MDC
https://www.facebook.com/groups/Messydesk/

Shabby Scraps *may DT project*


here is a mini album i created useing products from
the zibbet shop shabby scraps
here is a link to the shop
 http://www.zibbet.com/shabbyscraps?offset=3#navlink
The list of products i used are 

  • Large bird house mini album 
  • acrylic flowers in aqua 
  • seam binding in peacock 
  • pearl bows 
  • chiffon rose trim in cream 
  • white braided trim 
  • resin flowers in mint 
  • venise butterflys  
  •  venise applique butterflys 


here is the charm i made to go on my mini
The list of products i used are 

  • venise butterflys
  • pear pins 
  • bird cage charm 
  • large blank cameo setting 
thanks for looking
Hugs Kimmie

MDC may challenge (mothers day)

This one was a must do for me because i wanted to 
take the challenge and use the challenge as my mothers day 
gift for my momma
so i made a gift set for my momma 
so i guess ur asking well what is it right lol 
well the challenge was to create a altered item scrap page any thing 
really but i had to have a picture of a woman who has 
made a impact on your life and well i guess that woman is my mom 
she has all way been a guiding light in my life so 
any who i made her a alter photo frame to start then i wanted to make more 
so  made her a mini album then her mini album needed a box 
and then i wanted to make her a decoration cause any one who knows 
my mom knows she loves knick knacks i made her a bird house 
my goal was to create most of the embellishments by hand 

  
so on this photo frame i use hand made rolled roses and pearlst
trim and a molded butterfly ( i have a you tube tutorial on that) 
shabby scraps acrylic flowers pearl bows and lace butterfly's
this is the mini i made my mom it is this shape to fit inside the box i made here 
the photo frame was a RAK from crassia during Christmas time 
the flowers are all hand rolled roses i used another molded buttterfly 
and pearl trim and light pink bling 
i also made a mini album charm 
the paper i used on the whole set is chateau lavender  
and use a seam binding method 
her is the box i made 
its covered in the same paper line as the rest with lots of lace 
and hand rolled roses with a sentament from the paper line 
that says memorys and the cameo on the front is hand made by me 
i use a mold muse mold from etsy and used sculpty to make it then i painted it
this is the bird house i made my mom is is covered in the same paper line 
and compleatly covered in rolled roses an i trimed the roof in pearls 
and added a few pearl loops in the flowers 
here is a close up of the moled lace butterflys i made for this project 
you can find a tutorial on my you tube channel 
here: http://www.youtube.com/watch?v=u-1tz-CV46Y&feature=plcp
you can find the butterflys 
here:  http://www.zibbet.com/shabbyscraps?offset=3#navlink
here is a picture of the whole set


thanks for looking 
if you have any questions just ask :-) 
hugs Kimmie

Mdc May ATC swap


well this one was different for me
i have made ATC's be for but to come up with one
was a little nerve racking because im a embellisher 
and to work on such a tiny surface was my challenge and then this one 
had a theme the theme was our favorite things 
so i decited i love tea pot teacups lace flowers charms pink and pearls
so any who heres my pix of my ATC's
thanks for looking
hugs Kimmie 


Monday, April 30, 2012

Exciting News!!!!!!!

Soooooo I have some exciting news to share with all my 
wonderful readers a fabulous zibbet shop just opened up 
and I had the pleasure of accepting the invite 
to join a design team of talented lady's and join in on the design team 
fun!!!!! 
so check out these lovely lady's i will be having the pleasure to 
work with and all the great inspiration they bring to the crafting world 
and to see the goodies we will be working with just click on the link below


Monday, April 16, 2012

MDC April Challenge

The requirements:

MDC April Challenge
Theme: Recycled Wreath
Requirement: 50% Recycled Materials
Deadline: April 15th
The challenge for April is to create a wreath using recycled materials.  Be creative!  The only requirements are that it resembles a wreath and 50% of the materials used are recycled.
This challenge begins on March 21, 2012 and ends on April 15, 2012.  Voting will take place April 16th through the 19th.
Submit a photo of your completed project below.
The result :
The wreath i made is 98% made of recycled material
material's i used are 
  • 1 ACU top 
  • 1 ACU pant
  • 2 wire hangers 
  • 1 old red t shirt 
  • 1 old blue t shirt 
  • 1 old white t shirt 
  • a americana heart and star i found at goodwill 
  • 3 new buttons 
  • 6 feet of 20 gauge wire 
  • lipstick red folk art paint 
  • vintage white folk art paint 


to start making my wreath i bent the two hangers in a circle 
i had hubby cut the top of the hangers off for me 
then use 20 gauge wire an wired them together 
making a hook at the top of the smaller one 
so i have something to attach the heart to 
then i made a huge pile of shredded ACU material 
then i just tied them on the wire hanger circles 
then i made flowers out of the old t shirts 


 then i pulled apart the heart and sanded it and re painted it 
then sanded it to age it a little again 
then hot glued some buttons onto the blue star 


this is the result 


then i twisted together 4 pieces  of 20 gauge wire 
and made the hanger for the heart 
then i attached the flowers to the wreath by hand sewing them on!
then i attached the heart to the loop of wire hanger with a heavy duty stapler
 
TFL... hugs Kimmie 

Wednesday, April 4, 2012

some one squirreled and told me its your birthday!!!!

I just love how this card turned out!!!
One of my dearest friends asked me to make her 
a card with a squirrel on the 
the front so this is what i came up with!
I used tons of wild orchid craft flowers.
and the paper is from dcwv and my minds eye. 
the image is a digital  motivet stamp and
colored with my spectrum noir and copics.
the sentiment i came up with and printed it out and turned into ribbons.
and i used some lace ribbon and a paper doilies to tie it all together
the inside of the card! 
thanks for looking hugs Kimmie

Tuesday, March 20, 2012

Feel better soon card!

Happy first day of spring!!!!
well as winter turns into spring in Washington state 
it feels like the infamous yucky cold come knocking on our door!
right now every one i know has a cold, cough or the flu!
soooooo I am trying my hardest to stay away so i don't get it 
but i want them to know i still care an love them!
sooooo with that being said i decided to make 
a few get well soon cards!
i got the idea for this card by watching you tube 
the channel i seen the flowers on is: vadeler
she made the prettiest card!


the card is a standard A-2 card
the designer paper i used is from hot off the press
the solid paper is from the dcwv line the chateau lavender
and the punches i used are from Martha Stewart
the boarder punch is called the arch boarder punch 
the butterfly punch is called 3-1 Classic Butterfly Punch
the sentiment is from hot off the press stamp of the month club!
soooo using my cricut and gypsy 

i made these cute little tulips!
 the cartridges i use are:
for the tulip flower i used - mothers day bouquet
for the tulip stem i used - walk in my garden
these are the cuts i used

to get the tulip shape i just trimmed off two of the petals 

then you just fold the bottom petal up wards and tack down with 
a foam dot to have the 3D look!
Then i used my pebbles glitter chalks to edge it !
to attach it to the stem simply snip off the tulip tops of the die cut 
and adhere it down with some wet glue i used glossy accents 
but any glue will work!
 to get the look on the card i just layered up three of the stems 
and then i cut apart another for the leaves and 
added the leaves on top of the it to give it a 
bouquet look!
then for the little pot!
 i drew out a pot and pot rim on thin chipboard 
an cut it out to make my own little 
stencil!
 then i traced it on some light blue card stock and cut it out!
then i used my pebbles glitter chalks to edge it!
I glue the rim down to the top and placed it on the card 
with some foam dots!
and then I hot glued down a organza bow!
then just punched a few small butterfly's in lavender and placed them around the flowers
and a large one on the flower pot! 
Thanks for Looking 
and i wish you all the flowers spring can bring!!!
hugs Kimmie