
Supply List:
*8 pieces of 12x12 thick chipboard
*5 sheets of designer paper
two sheets for the out side
four sheets for the inside
and one sheet for the boarder
(i used rosewood by colorbok)
*paint color of choice (i used vintage white by folk art)
*8 sheets of white card stock
*hot glue gun
*hot glue sticks
*boarder punch (i used scallops by fiskers)
*hole punch ie. cropadile
*mod podge
*ruler
*pen to mark the measured lines
*paint brush for paint
*paint brush for mod podge
* flat back pearl trim
* 2 screws and washers if you plan to hang it

Lets begin!
step 1. cut chip board to these measurements
five pieces of 6x12 inch chipboard
4 pieces of 6x4 inch chip board
Tip: i used my westscott titanium paper trimmer to cut my chipboard
the blade seems to be longer and with a little pressure it cuts
nicely
step2. cut 24 6x2 inch strips of white card stock then
score at the center and fold in half
(see pix for example)

step 3. hot glue the folded strips to the ends of
all the the 4x6 chipboard on both sides.
(see pix for example)

step 4. hot glue together two of the 6x12pieces of chipboard.
step 5. find the front edge's of the of the 6x12 and 4x6 chipboard pieces
and paint them with the color you choose.
step 6. time to make the top and bottom of the shelf
grab 4 of the 12x6 pieces of chipboard hot glue one
piece to another to make the shelf sturdy and the repeat
with the remaining two pieces of chipboard
then paint the edge that will be facing the front of your shelf !
(see pix for example)

step 7. grab one of the 6x12 pieces of chipboard this piece will
be the center of your shelf with your ruler measure 4inchs in and 8 inches in
and draw a line and then repeat on the other side this will be
where you attach the slats
(see pix for example)

step 8. now grab the 6x4 pieces and hot glue them down to the lines you
drawn on the center shelf make sure you have all
the painted edges facing the same way!
(see pix for example)

step 9.. you should have 8 pieces of the folded white card stock
grab 4 of them and hot glue them to the ends of the center shelf
this is what is going to hold the side walls on
(see pix for example)

step 10. measure the 4 inch and 8 inch mark on the chipboard
you made for the top and bottom of the shelf make sure to
just mark lines on the inside piece of the chipboard
(see pix for example)

step 11. making sure the painted edge is facing the same direction
of the rest and hot glue the top and bottom chipboard to the
remaining tabs
then with the last four of the folded white card stock tabs
hot glue them to the edge of the top and bottom pieces of the shelf
this will be what hold the side walls on!
(see pix for example)

step 12. now its time to measure the height of the shelf
this will be different for each shelf depending on the thickness
of the chipboard you use!
(for example my shelf measures 8 1/2 inch's tall x 6 inch's wide)
step 13. cut the last four pieces of 6x12 inch to the height of
your shelf
then hot glue them together to make two sides for your shelf
then paint the edges that will be facing the front of your shelf !
step 14. now hot glue the sides to the white tabs on the shelf
(see pix for example)

step 15. now its time to make the back of your shelf
the back should measure the height of your box times 12
(for example my back measures 12 x 8 1/2)
then with the last two pieces of 12x12 chipboard cut them to the
height of your box then hot glue them together!
(i want to be able to hang it on the wall so i am cutting two pieces of
chipboard to make it strong enough to hold the weight of the marker
but if you want it to just sit on your desk one piece of chip board for the back will work)
step 16. time to paper the back of the shelf that will be showing threw
the front cut your designer paper to the size of the back of your shelf
and paint on some mod podge and adhere it to the chipboard!
(see pix for example)

step 17. (this step is only for hanging your shelf if you choose to set it on your
desk or shelf then you can skip this step)
with your ruler measure one inch down from the top of the shelf and draw a line
then on that line mark the 2 and 10 inch spot on the back
step 18. to adhere the back to the cut a two 2 inch by the height of your shelf
strip of white card stock an two 2 inch by 12 inch strips of white card stock
score at 1 inch fold in half and then hot glue them to the edges of the back of
your shelf !
(see pix for example)

step 19. time to paper the in side !
with the 4 pieces of designer paper you choose for the inside cut
six 12x 6 pieces
and
six 4x6 pieces
step 20. paint on mod podge
line it with one of the 12x6 inch strips of paper
then adhere one of the 4x6 inch strips of paper to the empty
space of the square!
(see pix for example)

(do this on all six squares of your shelf )
step 21. time to paper the out side!
with the two 12x12 pieces of designer paper that you choose
cut them to 6 x12 inch's
on the sides of the box paint on some mod podge and then adhere
the paper and then wrap it around and adhere down do this for both sides
then paint some mod podge on the top and adhere down the paper
and the repeat for the bottom!
(see pix for example)


step 22. time to make the boarder!
with the last 12x12 sheet of designer paper cut it to
12x3 inch strips make 4 strips to wrap around the back of your box !
(see pix for example)

step 23. using your boarder punch, punch one side of the
the paper to make a decorative edge!
step 24. using the mod podge adhere the boarder around the back edge
of the top of your box starting with the sides first!
step 25. using your hot glue and flat back pearls trim the
edges of the front of your shelf!
(see pix for example)


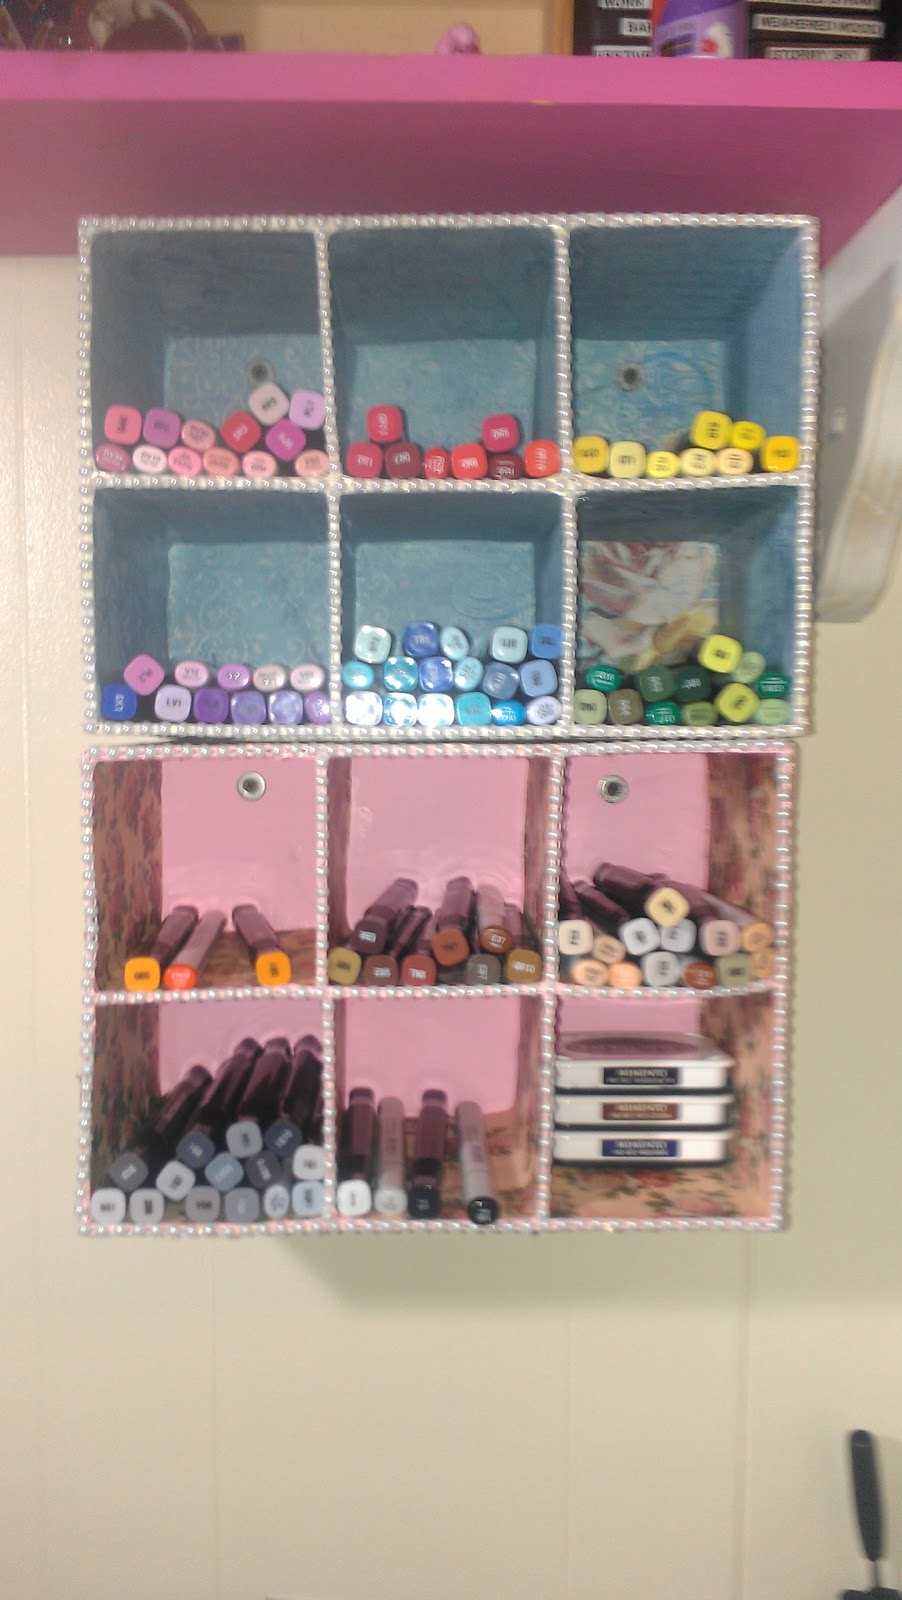
and walla there you have it your very own shelf to organize
your copics, spectrum noir markers or inks and other crafting tools !
you can make a couple and stack them on your desk
like this!

with making two shelf boxes I'm able to
organize my markers by color a slot for my
pinks
reds
purples
greens
yellows
browns
oranges
blues
grays
blacks and blenders
skin tones
and even a spot to hold my memento ink!
or hand on the wall like this
( i used 2 screws and 2 washers to hang each box)

I hope this tutorial helps with your storage needs if
you need any help trying to understand my ramblings lol
let me know i will try and help as much as possible !
hugs Kimmie
Amazing job Kimmie! Going to try this
ReplyDeleteits sooo much fun to make if you need any help let me know love!!
DeleteYour an angel and this is so ingenious! I'm going to give it a try. Wish me luck:) thanks for the tutorial and all the pictures, it helps more than you know!
ReplyDeleteDekida